Intro Video
Table of Contents
- ForneyField™ Key Features
- Installing ForneyField™
- Quick Start Reference
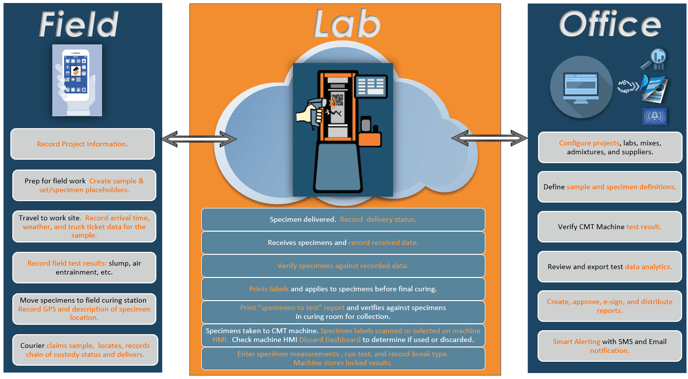
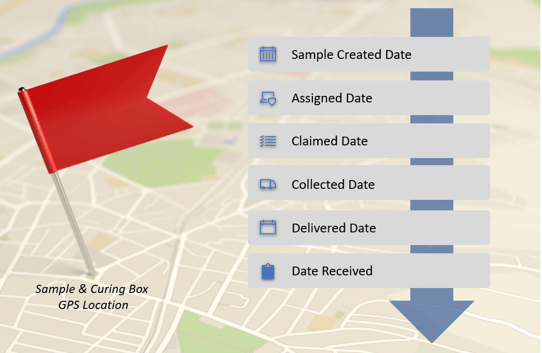
- Process Flow From the Field to the Lab
- Login
- Menu Options
- Settings
- Customize Settings
- Customize Sample Form Fields
- Using the Dashboard
- Managing Samples for Your Default Lab
- Add or Copy a Sample
- Add Set & Specimens To A Sample
- Searching/Filtering Samples & Mine Button
- Edit Samples And Sets
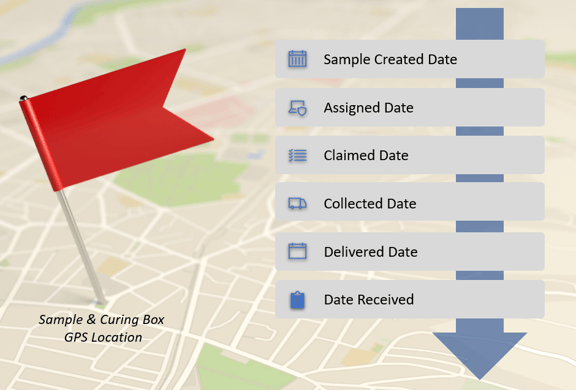
- Sample Status Workflow & Tracking
- Capture GPS Location of Sample
- Locating Samples in the Map
- Working Offline Without Network Connectivity
- Additional Information
- Tutorial Videos
ForneyField™ Key Features
- ForneyField integrates with ForneyVault and allows you to create and manage samples for your lab.
- ForneyTools supports field-specific data that is captured and generated by ForneyField.
- ForneyField users can also add Projects, Locations, Suppliers/Concrete mixes, and Admixtures from the field if needed.
-
Stay productive in the field even when you don’t have internet access. ForneyField is designed to work offline when users don't have internet access. The app will warn users when working offline. Data entered offline will synch with ForneyVault when you re-establish network connectivity.
- ForneyField uses GPS to allow you to specify the location of samples and field curing boxes. Users can open a sample's GPS location in their phone's Map app for efficient collection.
- ForneyField allows users to manage sample workflow and track sample status from casting to lab delivery.
- ForneyField provides customizable sample form field to keep your data field list concise.
- ForneyField supports Spanish, which can be configured within the App's Settings screen.
Installing ForneyField™
Available on Google Play and Apple Store


Quick Start Reference
Step |
Where |
Default |
Tip |
|
| 1. | Customize Sample Form Fields | Settings->Customize Settings->Sample Form Fields | All fields are enabled | |
| 2. | Set Language | Settings->Customize Settings->Language | English | |
| 3. | Set Units | Settings->Customize Settings-Units | Imperial | |
| 4. | Ensure Project and Location Records are available before before adding Samples | Settings->Settings | Values previously created in ForneyTools are available | |
| 5. | Ensure Suppliers, Concrete Mixes, and AdMixtures are setup before you Add Samples | Settings->Settings | Values previously created in ForneyTools are available | |
| 6. | Check your Lab's Dashboard and view relevant sample as needed | Dashboard->Status bars to view those samples | Samples created for the lab within the last 56 days, both from the app and ForneyTools | |
| 7. | Add Samples, Sets, and Specimens |
Sample->Add Sample Sample->Select Sample Record->Set Add |
When adding a sample, indicate curing box location at the bottom of the form to activate Locate/Find Uncollected. When adding a set, be sure to indicate number of specimens in order to auto set Sample status to Cast. |
|
| 8. | Edit Sample, Set details |
Sample->Select Sample name from list->Edit Sample->Select Sample name->Save
Sample->Select Sample name from list->Edit Sample->Select Set Name->Edit Set->Save |
|
|
| 9. | Edit Sample Status & Progress Workflow |
Sample->Select Status action button from Sample record row Sample Status-> Select Calendar icon->Choose date and select OK->Save --OR-- Find Uncollected->Sample-> Select Status action button from Sample record row Sample Status-> Select Calendar icon->Choose date and select OK->Save |
|
|
| 10. | Track and Locate Samples |
Sample->Locate Sample link in Sample record row. Find Uncollected->Sample details bar->Open Map link in the Sample details bar -- OR -- Find Uncollected->Top Search bar->Sample details bar-> Open Map link in the Sample details bar -- OR -- Find Uncollected->Map Pin->>Sample details bar-> Open Map link in the Sample details bar |
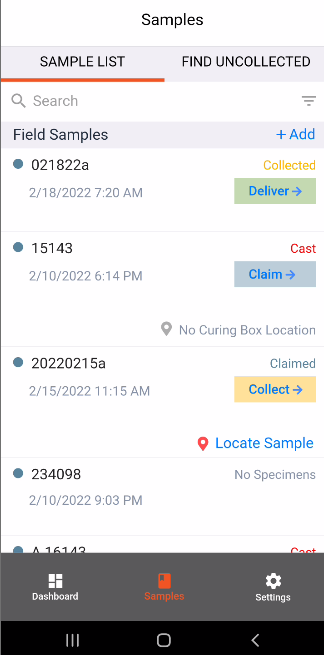
A sample record must have both a Curing box Location GPS coordinates AND sets with specimens. If a sample has specimens but is missing curing box location, the sample list record will display No Curing Box Location. If a sample has curing box location but no specimens, the Sample list record will display No Specimens. |
Process Flow From the Field to the Lab
Intro Video
ForneyField™ Login
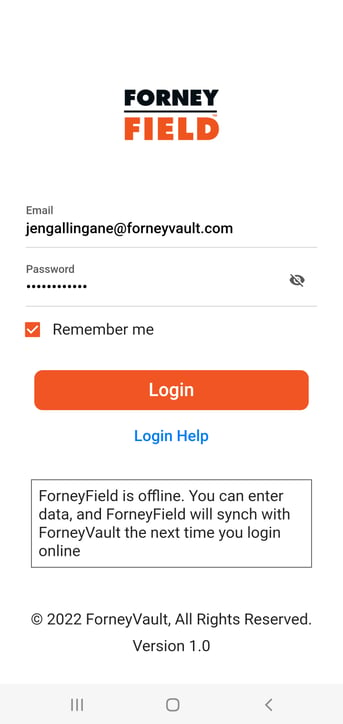
- ForneyField connects to your organization's existing ForneyVault instance.
- Use your existing ForneyTools login for ForneyField.
- Select Remember Me if you want the app to save your login for quicker access in the future and if you think you will be working offline.

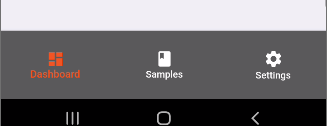
ForneyField™ Menu Options
- Dashboard: view samples that are in process and not yet received in the lab.
- Samples: Add, edit, and manage samples and sets.
- Settings: Customize ForneyField, synch data, and logoff
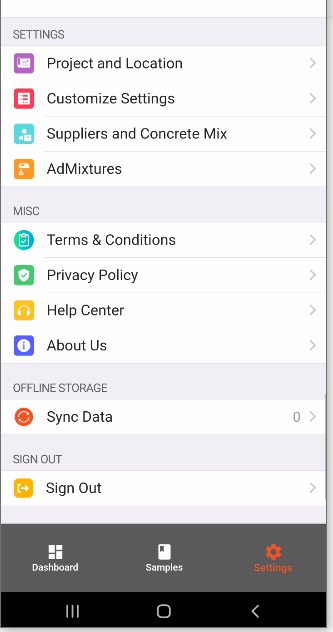
Settings
- The Settings features enables you to define projects and locations that were not previously set in ForneyTools.
- Users may also add Suppliers, Concrete Mixes, and Admixtures while in the field.
- Data related to settings is synchronized with ForneyVault. Data previously defined in ForneyTools for your lab will be available in ForneyField, and any data adding in ForneyField Settings will load to ForneyVault.
- The Customize Settings option allows you to customize the sample form, app language, and units.
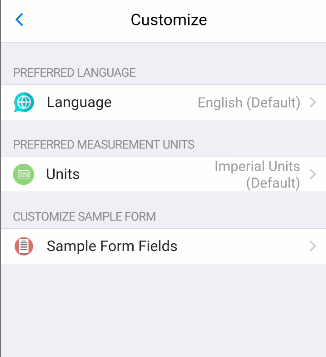
Customize Settings
- Language: English or Spanish
- Units: Imperial or Metric
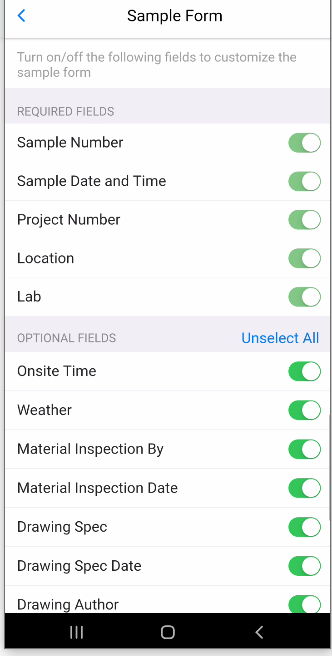
- Sample Form Fields: Choose your non-required fields
Customizing Sample Form Fields
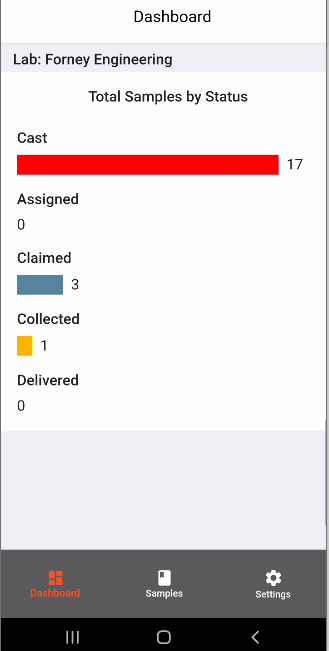
Using The Dashboard
- Tap on a status bar to open those samples in the sample screen.
Managing Samples for Your Default Lab
- ForneyField displays the last 56 days of samples associated with your default lab.
- Samples created in ForneyTools for your lab will also display in ForneyField.
- ForneyField supports sample tracking status from Cast to Received at the lab.
- Received samples do not appear in ForneyField, but are available in ForneyTools.
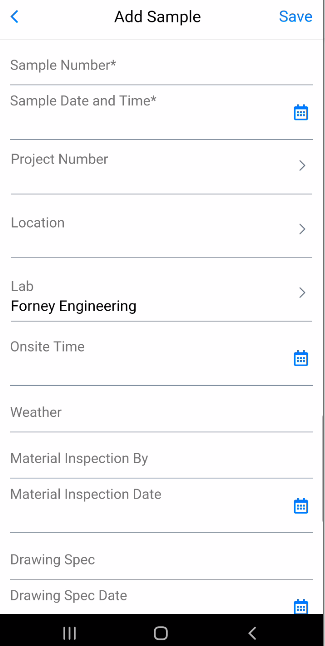
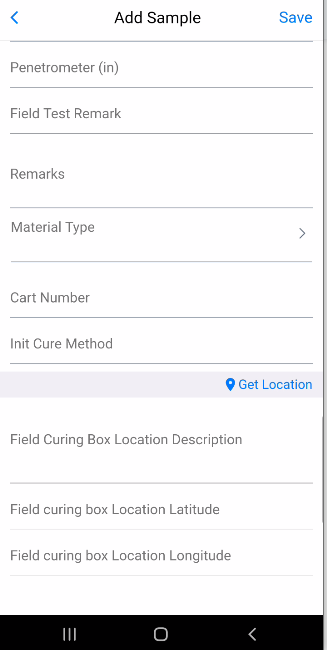
Add Sample
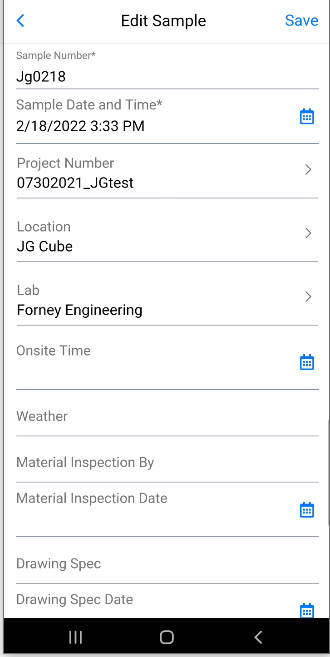
- Required fields for adding a sample include
Sample Number- Sample Date and Time
- Project Number
- Location
- Lab
- Required fields for Finding Samples via GPS:
- Field Curing Box Location
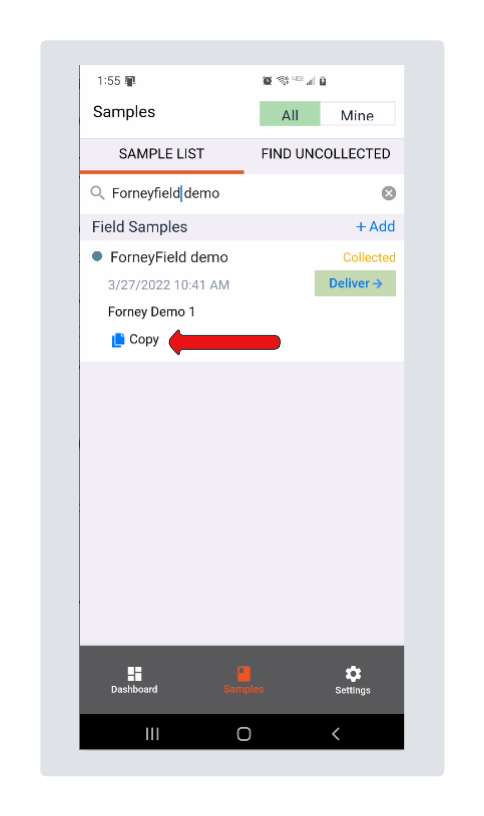
Sample Copy
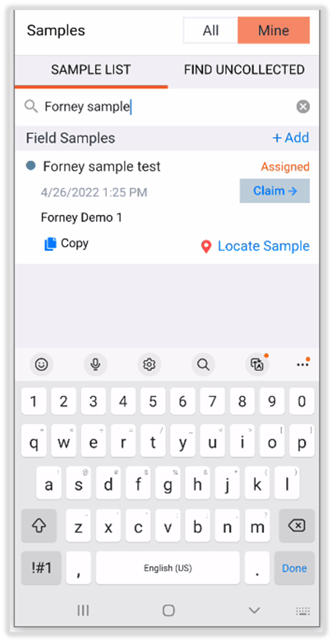
- From the Samples-Samples List screen, navigate to the sample that you want to copy. The Copy button is displayed in the bottom left of the sample record as shown by the red arrow in the following picture. Tap on the Copy button to copy that sample and create a new sample in Add mode.
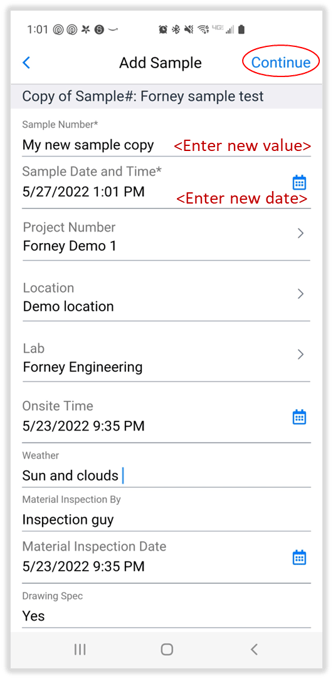
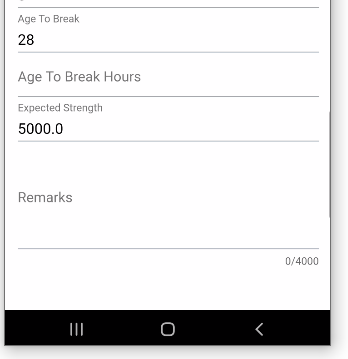
- After you select Copy, the new sample will be opened in Add Sample screen. Before the new copied sample can be saved, you must provide a Sample Number and Sample Date and Time. Sample copy includes 31 fields. Be sure to add any other necessary data and make changes to copied data as required.
- After you finish entering data, tap on the Continue link in the top right. This will take you to the Add Sets & Specimens screen where you can add specimens as a list by break age or create the sample without sets. You can add sets at any time after creating the sample.
The following Sample data fields are included in Sample Copy:
|
1. Project ID |
|
2. Location Name |
|
3. Lab Name |
|
4. Description |
|
5. OnSiteTime |
|
6. Material Inspector |
|
7. Material Inspect Date |
|
8. Drawing Specification |
|
9. Drawing Spec Date |
|
10. Drawing Spec Author |
|
11. Site Supervisor Notified |
|
12. Site Supervisor |
|
13. Supplier Name |
|
14. Mix Name |
|
15. Expected Strength |
|
16. Design Age |
|
17. Plant Number |
|
18. Unit Weight Minimum |
|
19. Placement |
|
20. Placement Time Start |
|
21. Placement Total |
|
22. Sample Interval |
|
23. Min Temp |
|
24. Max Temp |
|
25. Engineer |
|
26. Field Tech |
|
27. Material Type |
|
28. Initial Cure Method |
|
29. Field Cure Box Lat |
|
30. Field Cure Box Long |
|
31. Field Cure Box Desc |
Add Set & Specimens To A Sample
Add Sets & Specimens As a List
- Field technicians must create many samples during the day and need to work rapidly. Adding Sets & Specimens as a list is quick and accurate.
- The Add Sample screens display a Continue link in the top-right menu. After entering or editing your sample data, tap Continue to open the Add Sets & Specimens screen.
- You can now edit or enter values for:
- Specimen type (Note: One specimen type may be chosen on this screen)
- Default specimen
- Expected strength
- List of specimens by set break age (where age is in days)
- Values in "List of specimens by set break age" should be comma-separated. Use H or h to indicate a hold set.
- If you have previously added sample sets and specimens, this screen will automatically provide suggested default values. The app remembers the values for the last sets and specimens you created. These default values will automatically populate in the screen.
- Users can also skip adding sets and specimens and add them later from the Manage Sample screen.
The "Add Sample" screen displays a Continue link in the top-right, whether adding a new sample or copying an existing sample.
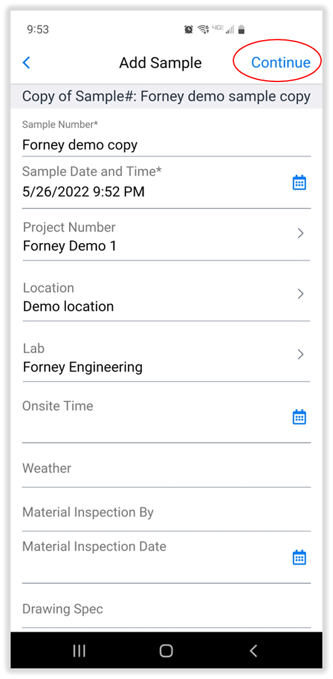
Tap on Continue to go to the Add Sets & Specimens screen. You have the option to Create Samples & Sets or Create Sample With No Set. You can add sets and specimens later from the Manage Sample screen. You can use default values that the app remembers from the previously entered sets or enter new values. This screen allows you to create sets of a single specimen type. If your set has multiple specimen types, you can manually add more sets of other types using the Manage Sample screen.
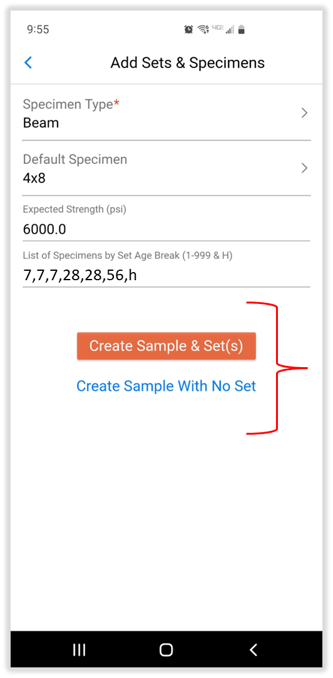
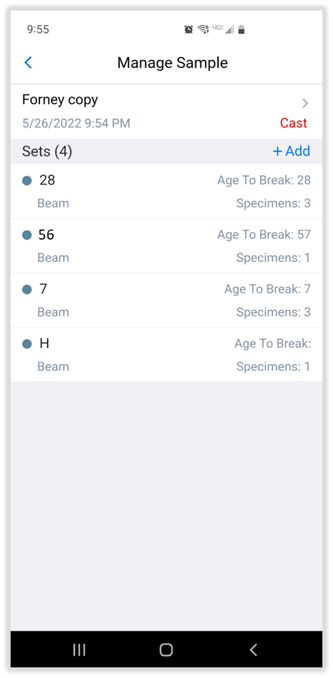
This specification created and named 4 sets with 8 beam specimens according to break age days. The H set is the hold set. The set break ages reflect the age provided in the list. Sets and Specimens created for the list (7,7,7,28,28,28,56,h) are as follows:
| Set Name | Number of Specimens | Age to Break | Specimen Type |
| 7 | 3 | 7 days | Beam |
| 28 | 3 | 28 days | Beam |
| 56 | 1 | 56 days | Beam |
| H | 1 | n/a - Hold Set | Beam |
Tap on "Create Sample & Set(s)" will then open the sample and sets in the "Manage Sample" screen. You can now perform edits as needed or add more sets of different specimen types.
Adding Sets and Specimens Individually
- After you add a sample, locate and open the sample from the Sample List.
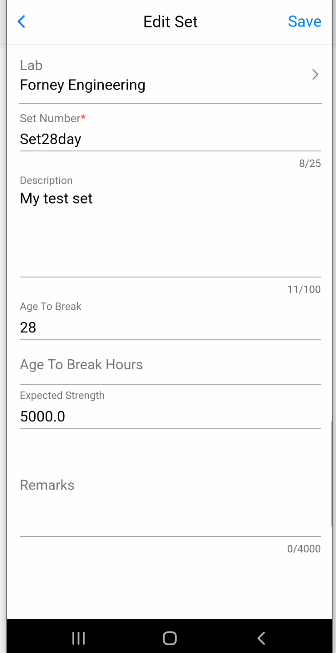
- You will be directed to the Edit Sample screen.
- Your next step is to Add a Set. The Set screen includes a field for number of specimens. You must indicate specimen number in order for the sample status to be set to Cast.
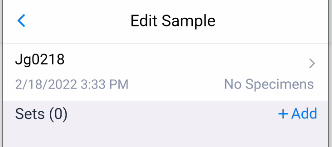
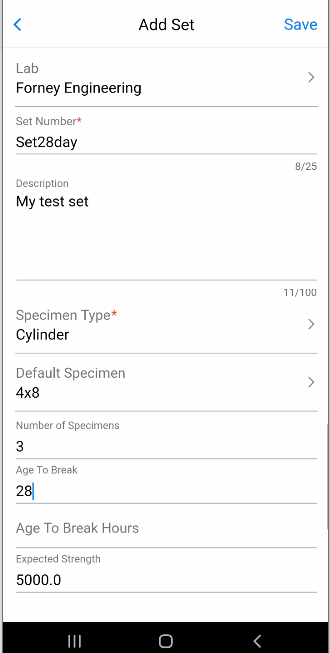
- Once a set and specimens are created, the sample status is set to Cast and the Sample can be located.

Searching & Filtering Samples
- The Sample screen includes a search field at the top of the list:
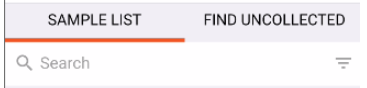
- Enter a search string such as Sample number.
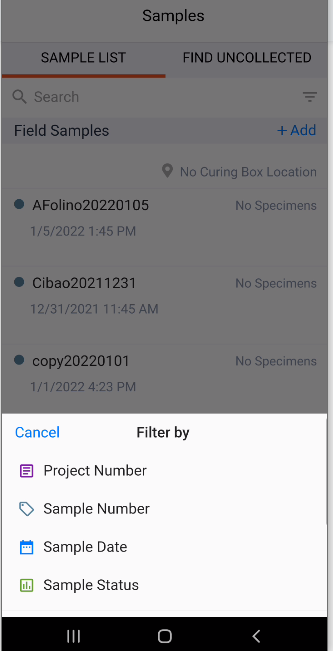
- You may also filter samples by selecting the filter icon in the search filter:

- The Search Filter includes options for Project Number, Sample Number, Sample Date, and Sample Status.
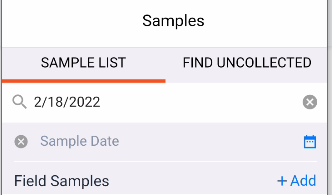
- When using the date Date Filter, you must then select the calendar icon and set the date.
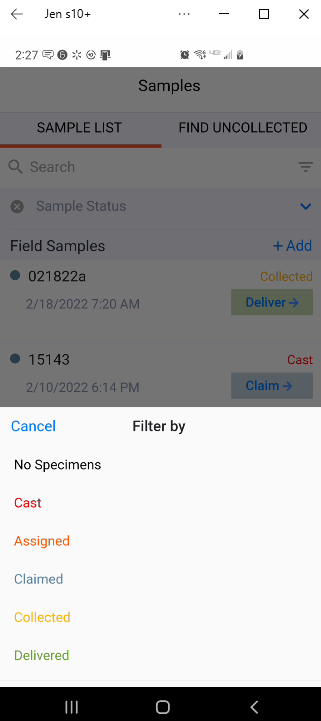
- When using the Status Filter, you must then select a status value option from a drop down menu under the search field:
The "Mine" Filter
- Field users quickly want to locate samples assigned to their username. The Mine filter improves a field tech's productivity when finding and collecting samples.
- The Mine filter is a button located on the top right menu of Dashboard, Samples, and Find Uncollected screens. Tap "Mine" to show only samples with your username in Assigned Tech, Claimed Tech, or Collector Name. Cast samples will also be displayed as they do not yet have an associated username. Tap on the "All" button to display all samples for all users in your organization's lab.
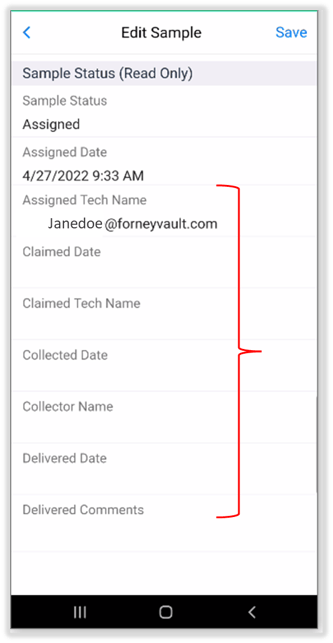
The Edit Sample and Add Sample screen include fields that contain username:
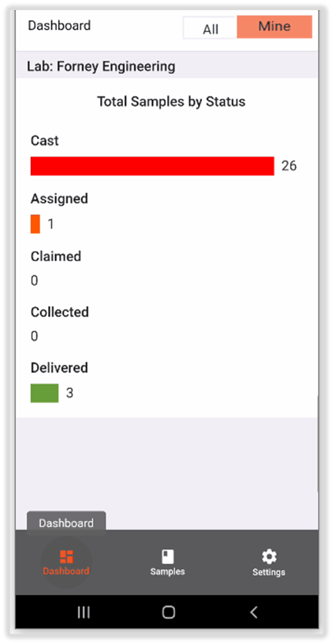
Tap "Mine" button in the top right menu of Dashboard to turn on and display only samples with your username:
Tap "Mine" button in the top right menu of the Sample List screen to turn on and display only samples with your username:
Tap "Mine" button on the Sample -> Find Uncollected screen to turn on and display only samples with your username:
Edit Samples and Sets
- To edit a sample, select the sample record entry in the Sample List.
- This opens Sample Edit. Tap on the Sample name to open it in edit mode. Tap on the Set row to open the Set in Edit mode.
Sample Status Workflow & Tracking
- ForneyField and ForneyTools support new sample status fields for tracking and managing sample workflow
- Cast: Automatically set when a new Sample/Set/Specimen is added
- Assign: Completed in ForneyTools Sample Form
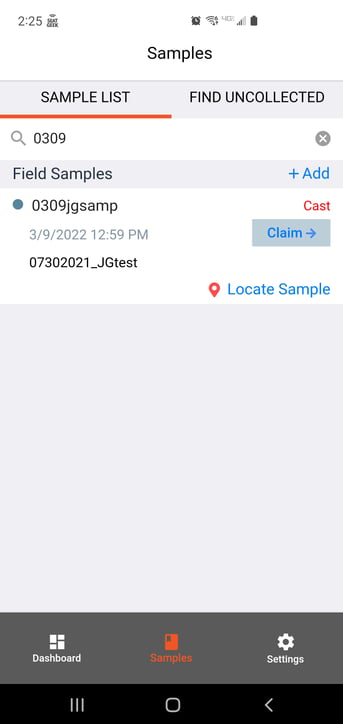
- Claim: Completed in the ForneyField or ForneyTools when a tech claims a sample to collect
- Collect: Completed in the ForneyField when a tech retrieves the sample
- Deliver: Completed in the ForneyField when a tech Delivers the sample
- Receive: Completed in ForneyTools when the lab receives the delivered sample.
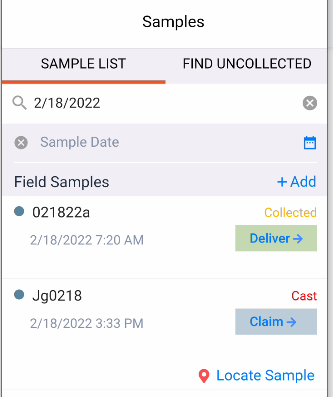
- Status is located in the Sample record:
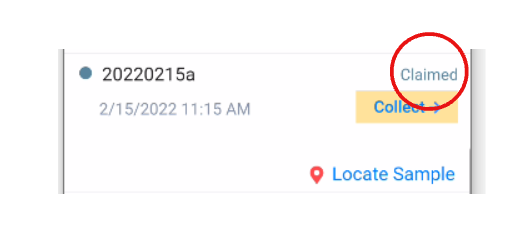
- To set the next field status and date, select the button labeled Claim, Collect, or Deliver.
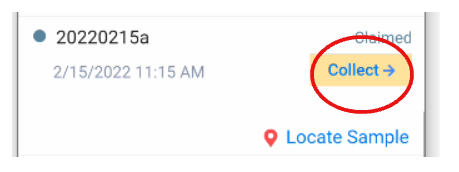
- In this example, status = Claimed and next status workflow action is Collect.
- Select the Collect button.
- You will be directed to the sample status screen. Select the Calendar icon, choose a date, and select Save.

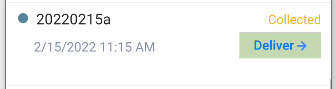
- The updated status and sample action will then be reflected in the sample's record.
- In this example, the status was changed from Claimed to Collected.
- The next status workflow action is Deliver.
Capture GPS Location of Sample
- You must specify the Field Curing Box Location in order to use the Locate Sample and Find Uncollected features.
- Once the sample is cast and has specimens, the locate/find will be enabled for the sample.
Locating Samples
- To use Locate Sample and Find Uncollected, you must be sure to set Field Curing Box Location gps coordinates. You can do this when you Add a Sample or Edit a Sample.
- Samples must also have sets with specimen(s) to activate the locate feature.
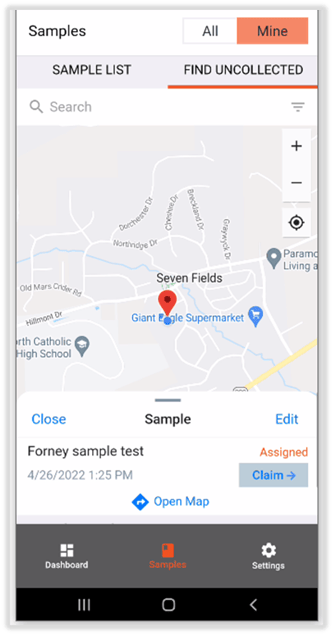
- Select the Locate Sample link in the Sample Record.

- Locate Sample will open the sample in the Find Uncollected map screen.
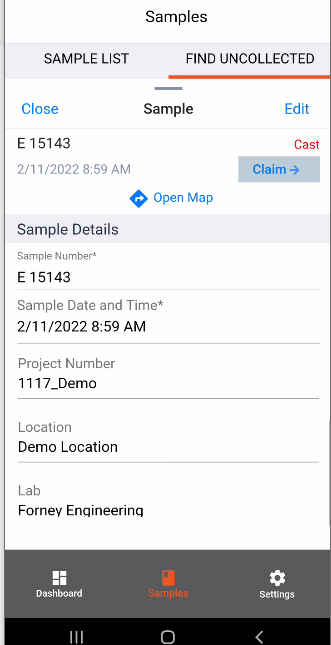
- Swipe up on the Sample details to view more info if needed.
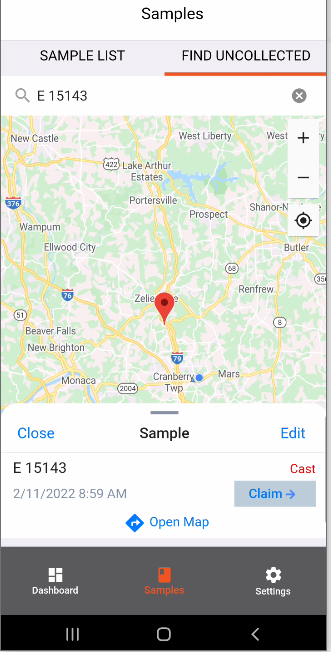
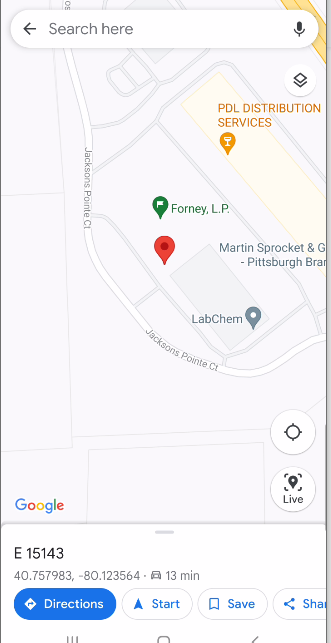
- Tap on the Open Map link in the Find Uncollected->Samples header to open the GPS coordinates in your phone's default map app.
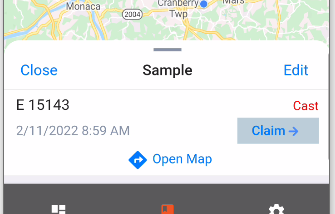
- This launches the GPS coordinates in the map.
Working Offline Without Network Connectivity
- The first time ForneyField™ is used, you must be online in order for data to synch from ForneyVault® to ForneyField.
- ForneyField will then be able to work with no network connection.
- Any data that you enter while offline can be saved locally in the app.
- When you are online again, the app will automatically synch data to ForneyVault and will display a red synching icon next to the impacted sample records.
Offline Process Overview
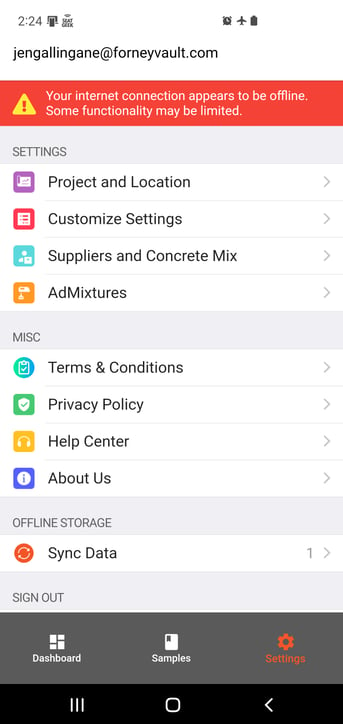
- When offline at time of login, the app will display a clear warning.
- An offline warning message is clearly displayed at the top of the app.
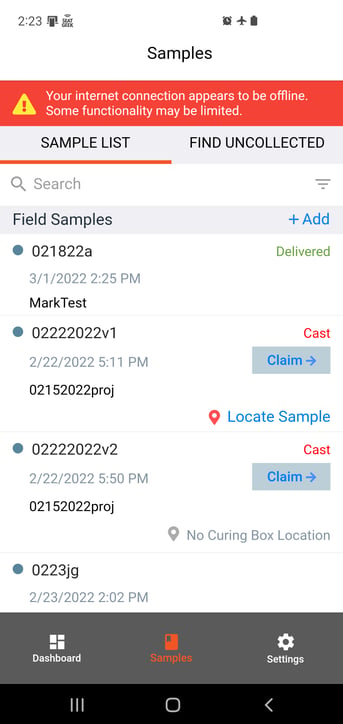
- You can continue to open and edit data records while offline.
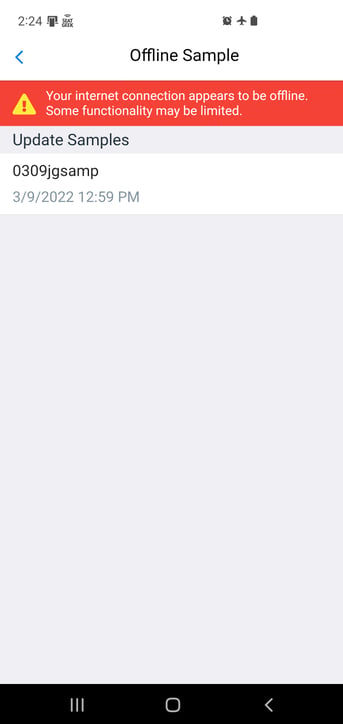
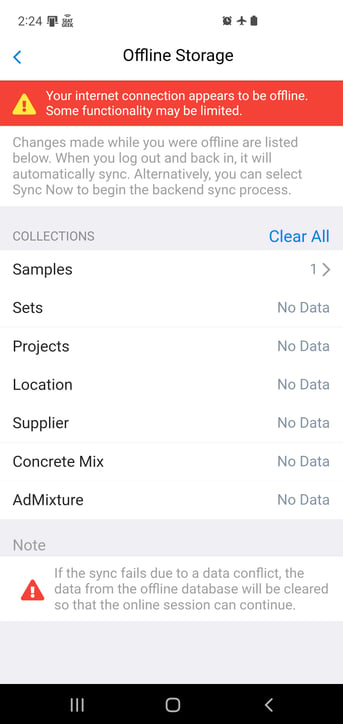
- While offline, you can view an audit trail of changes made while offline
- Go to Settings->Offline Storage->Sync Data.
- Data elements with un-synched offline data will be displayed with a number.
- The number indicates how many data record changes were made offline.
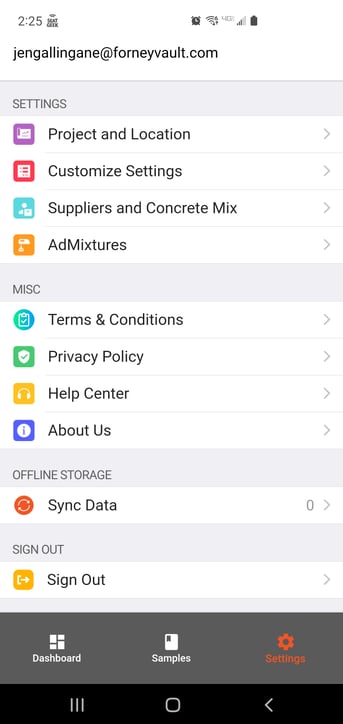
- The app is now online. Data for the edited sample synchs to ForneyVault.
- When Synch Data = 0, your app is fully synched with ForneyVault.
Additional Information:
- ForneyField Tutorial Videos
- Knowledgebase Article: ForneyTools Support for Field-Specific Data
- ForneyField™ Intro Video
- ForneyField™ Product Page